 to problem solve, and that the Internet does have the answers. I have gained a lot of insight this semester and I am excited to start next year!
Thursday, December 17, 2015
DreamWeaver
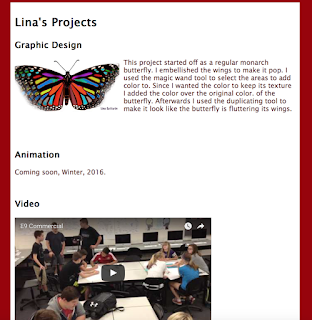
These are some pictures from Website made from Dreamweaver. I included my elevator pitch, bio, and some of my favorite projects. There is a link at the bottom of the projects page that takes you to the home page and vice versa. This was our final project in Graphic Design. I have learned a lot this semester in e-Communication. Graphic design particularly has taught me
 to problem solve, and that the Internet does have the answers. I have gained a lot of insight this semester and I am excited to start next year!
 to problem solve, and that the Internet does have the answers. I have gained a lot of insight this semester and I am excited to start next year!
Tuesday, December 8, 2015
Yin Yang Tutorial in Adobe Illustrator
STEP 1: First open up Illustrator and open a new page. Click on the Ellipse tool to start this tutorial.
STEP 2: Using the Ellipse tool draw a circle while holding down the 'shift' button so it is an even circle.
STEP 3: Using the Ellipse tool again draw two smaller circles that are the same size (use the 'shift button') and make sure they can fit into our big circle.
STEP 4: Then start moving the two smaller circles right on top of each other. Keep adjusting their sizes until they are equal and in the center of the first circle.
STEP 5: Next using the ellipse tool one more time make two very small circles to go in the center of our last two circles. These circles should be around 0.3mm and the same size.
STEP 6: Next go up to the tool bar and click Object. And select the entire project.
STEP 7: And then click Expand. When the Expand window opens, just leave it how it is and click OK.
STEP 8: Then, go to the left sidebar and click the Shape Builder Tool.
STEP 9: Now you can click in any section of the symbol. But now what you need to do it click on the farthest left section like shown and hold it and drag to the top circle.
STEP 10: Now it should look like this and now repeat on the right side.
STEP 11: Now it should look like mine.
STEP 12: Finally you can add any color to wherever it needs to go. This part is up to you but I stayed with the original Yin Yang look which is Black and White.
Wednesday, December 2, 2015
Colorful Butterfly
This project started off as a regular monarch butterfly. I embellished the wings to make it pop. I used the magic wand tool to select the areas to add color to. Since I wanted the color to keep its texture I added the color over the original color. of the butterfly. Then afterwards I used the duplicating tool to make it look like the butterfly is fluttering its wings.
This project was made with Adobe Photoshop.
This project was made with Adobe Photoshop.
Olathe Northwest High School
   |
This project was made with Adobe Photoshop.
Subscribe to:
Comments (Atom)


